To connect the AVer F17 document camera to your laptop, use the provided USB cable, install the AVerVision software, and ensure proper settings. Troubleshoot connectivity issues if needed for smooth operation.
Connecting your AVer F17 document camera to your laptop can open up endless possibilities, whether you’re teaching a class, delivering a presentation, or sharing visuals in a meeting. With its high-quality visuals and flexibility, the AVer F17 is a valuable tool for enhancing efficiency and engagement.
This blog post will guide you through the process of connecting your AVer F17 to various laptop types, troubleshoot common issues, and share tips for optimizing performance.
Introduction to the AVer F17 Document Camera:
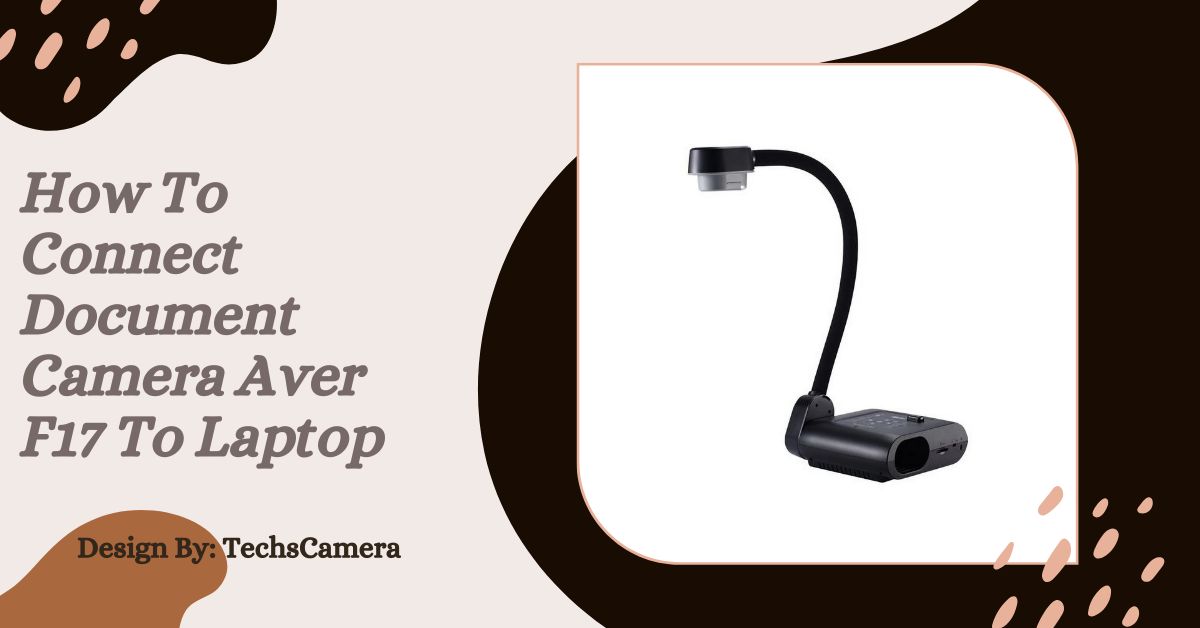
The AVer F17 document camera is a versatile, high-quality device designed for capturing and displaying documents, objects, or live demonstrations with clarity. Popular for its 5-megapixel camera and 32X zoom capabilities, it works well with digital setups, making it a classroom and office favorite.
Whether you’re showcasing educational content or enhancing your presentations, the AVer F17 offers robust features in a compact, user-friendly design.
Key Features of the AVer F17
- 5 MP Camera for crisp, clear visuals
- 32X Zoom to showcase fine details
- Flexible Arm Design for easy adjustment
- Plug-and-Play Compatibility with most devices
- Image and Video Capture for saving lessons or presentations
Now, let’s explore the step-by-step guide to connecting it to popular laptop operating systems.
Step-by-Step Guide to Connecting the AVer F17 to Your Laptop:

1. For Windows Laptops
Gather the Essentials
- AVer F17 Document Camera
- USB cable (included with the device)
- Your Windows laptop
Connect the Cables
- Plug one end of the USB cable into the AVer F17 and the other into your laptop’s USB-A port.
Install Drivers (if prompted)
- If the drivers aren’t auto-installed, visit the official AVer website, download the “AVerVision” software, and follow the instructions to install it.
Launch the AVerVision Software
- Open the software to activate the camera feed on your laptop.
Check Configuration Settings
- Go to Settings within the software to adjust resolution or camera settings as necessary.
2. For MacBooks
Gather the Essentials
- USB-C to USB-A Adapter (if your MacBook does not have USB-A ports)
- AVer F17 Document Camera
Connect the Camera to Your MacBook
- Use the USB cable to connect the AVer F17. If needed, use the USB-C adapter.
Install Software
- Download and install the “AVerVision” software from the AVer website to ensure compatibility with macOS.
Activate the Camera
- Open the AVerVision software or use macOS’s built-in apps like QuickTime Player to access the camera feed.
3. For Chromebooks
Gather the Essentials
- USB cable
- AVer F17 Document Camera
Plug in the Device
- Connect the camera to your Chromebook via USB.
Use Built-In Apps
- Chromebooks usually recognize the AVer F17 automatically. Open Google Meet, Zoom, or a similar app, and select the AVer F17 as the video source.
Check Permissions
- Ensure your browser or application has permission to access the camera.
Troubleshooting Common Issues:
If you’re encountering issues while connecting your AVer F17 to your laptop, don’t worry! Here are some common problems and quick fixes.
1. Camera Not Recognized
- Check all cable connections to ensure they’re secure.
- Switch to a different USB port on your laptop.
- Restart your laptop and reconnect the camera.
2. No Video Displayed in Software
- Ensure you’ve selected “AVer F17” as the default video source in your software.
- Update your laptop’s operating system or drivers.
3. Software Not Opening or Responding
- Uninstall and reinstall the AVerVision software.
- Confirm your laptop meets the system requirements for the software.
4. Frozen or Poor Video Quality
- Use a different USB cable to rule out hardware issues.
- Adjust resolution settings in the camera’s software for smoother performance.
Also Read: Is It Legal To Have Cameras In Patient Rooms – Understanding the Laws!
Practical Tips for Optimizing Camera Performance:
1. Position the Camera Correctly
Place the AVer F17 in a stable position with sufficient lighting to maximize clarity. Avoid direct light to reduce glare.
2. Leverage Zoom Capability
Make use of the 32X zoom to capture fine details when highlighting key elements of a document or object.
3. Adjust Resolution Settings
Lower the resolution when working on slower systems to ensure smoother video feed.
4. Keep the Software Updated
Regularly check for software updates on the AVer website to benefit from the latest features and enhancements.
FAQs:
1. How do I connect the AVer F17 to a Windows laptop?
Use the included USB cable, install AVerVision software if prompted, and activate the camera feed via the software for a seamless connection.
2. Can I use the AVer F17 with a MacBook?
Yes, connect using the USB cable or a USB-C adapter. Install AVerVision software for macOS compatibility or use QuickTime Player for live feed access.
3. Does the AVer F17 work with Chromebooks?
Absolutely! Plug it in via USB, and select the AVer F17 as the video source in apps like Google Meet or Zoom. Check camera permissions if needed.
4. How can I fix frozen or poor video quality with the AVer F17?
Try a different USB cable, adjust resolution settings in the software, or ensure your laptop meets system requirements for smoother video performance.
5. What should I do if the AVerVision software isn’t responding?
Uninstall and reinstall the software. Check your laptop’s system requirements and ensure all drivers are updated to resolve compatibility issues.
Conclusion:
Connecting the AVer F17 document camera to your laptop is straightforward with the proper setup. Whether on Windows, macOS, or Chromebooks, this versatile device offers seamless integration for various needs. By following the guide and optimizing performance through tips like proper positioning and resolution adjustments, you can unlock its full potential. Troubleshoot issues effectively, and enjoy enhanced presentations, teaching, or video calls with this reliable document camera.